
The reflection usually occurs when the camera’s infrared light bounces off nearby glass or another surface and returns to the lens. To fix security camera infrared night vision reflection, disable built-in infrared when recording through glass, adjust the camera’s position or angle, or reduce nearby reflective surfaces. Cleaning the lens and glass can also help.
A bright haze or washed-out night image can make it hard to see what the camera is recording. The window may not be the only cause: a nearby wall, shiny surface, dirt, or spider webs can also reflect infrared light. This guide explains how to identify the source and which adjustments can reduce glare.
Learn why cameras reflect light at night, why recording through windows is especially difficult, and how placement, lighting, and camera settings affect the image. You’ll also learn when a professional assessment can help resolve reflections that persist after considering the camera’s position and surroundings.
Key Takeaways
- Identify whether the glare comes from nearby glass, a wall, a rain gutter, or spider webs before changing camera settings.
- Camera position and viewing angle can reduce reflections more effectively than covering the lens with tape.
- When recording through a window at night, the camera’s built-in infrared can bounce off the glass and create a bright haze.
- Indoor lamps, TVs, and other light sources near a window can add to night-time reflections.
- An external infrared illuminator can improve visibility through glass when positioned away from the camera lens.
What Causes Glare and Reflection on Security Cameras?
Glare appears when strong light reaches the lens directly or reflects off a nearby surface. A professional assessment can distinguish direct light, infrared bounce-back, and physical obstructions before recommending an adjustment.
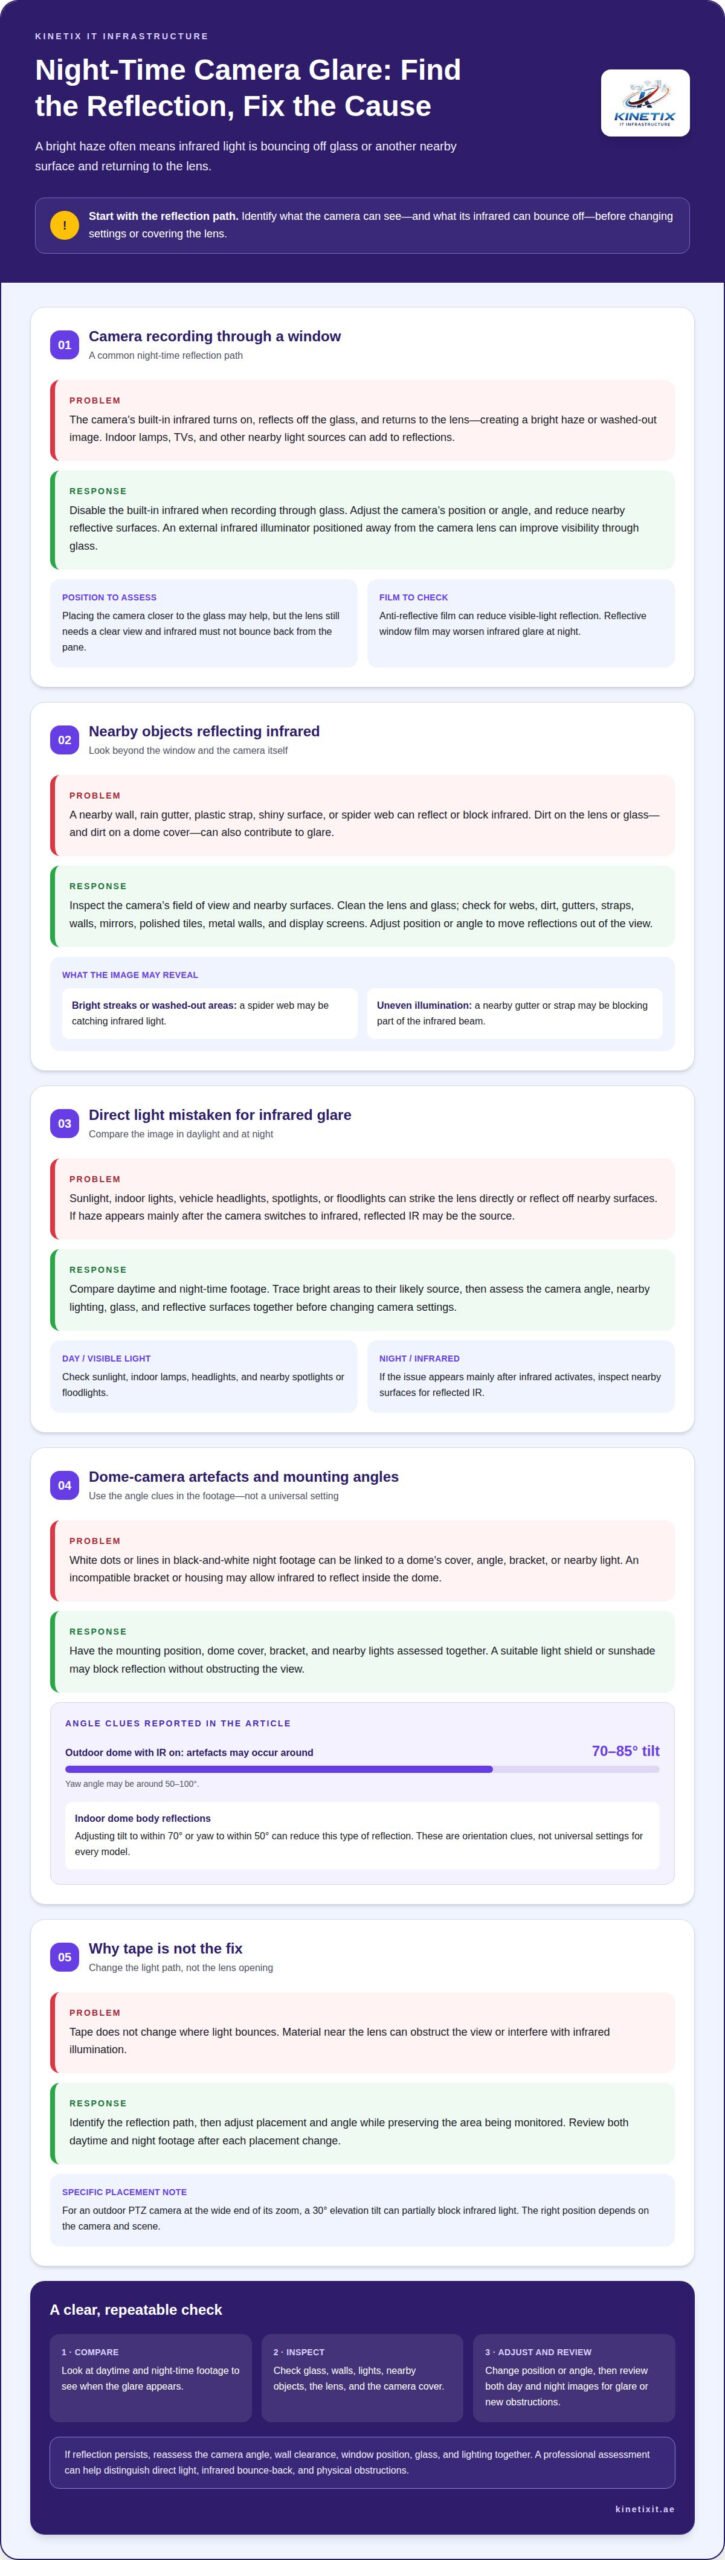
- Compare the camera image during the day and at night. Sunlight, indoor lights, vehicle headlights, and nearby spotlights or floodlights can create bright patches or haze. If the problem appears mainly after the camera switches to infrared, inspect nearby surfaces for reflected IR instead of assuming the sensor is faulty.
- Check a bullet camera’s field of view for rain gutters, plastic straps, and spider webs. A web can catch the camera’s infrared light and reflect it into the lens, creating bright streaks or a washed-out area. A gutter or strap close to the lens can also block part of the IR beam and cause uneven illumination. A professional can identify these obstructions before adjusting the camera’s angle.
-
Professional Inspection of Dome Brackets and External Lights
Have a professional assess an outdoor dome, its bracket, and nearby lights together. An incompatible bracket or housing can allow infrared light to reflect inside the dome, while a spotlight aimed at the cover can cause additional glare. The installer can check whether the mount suits the camera and whether a light shield or sunshade could block the reflection without obstructing the view.
-
Professional Assessment of Direct Light and Window Reflection
A professional can trace bright areas in the footage to their likely light source. Sunlight, vehicle headlights, and indoor lamps can strike the lens directly or reflect off windows, mirrors, polished tiles, metal walls, and display screens. A camera behind glass may show a white haze at night because built-in infrared reflects off the window and back into the lens.
- Include any window film in the reflection assessment. Anti-reflective film can reduce visible-light reflection and improve transparency, but reflective window film may worsen infrared glare at night. A professional can assess the film, camera position, glass, and lighting as one optical path. Film that looks clear during the day may still cause problems when the camera’s infrared LEDs turn on.
- Check the dome’s angle and cover when white dots or lines appear in black-and-white night footage. For an outdoor dome with IR on, these artefacts can occur at a tilt angle of 70-85 degrees or a yaw angle of 50-100 degrees. Dirt on the cover can also reflect infrared. A professional can assess the mounting position, clean-cover condition, and surrounding light before changing settings.
Can a CCTV professional use tape around my existing camera lens to prevent glare?
Tape isn’t a reliable way to control infrared reflection. It doesn’t change where light bounces, and material placed near the lens can obstruct the view or interfere with the camera’s infrared illumination. A professional should assess the camera’s position and surrounding surfaces, then adjust the installation rather than covering the lens.
- Identify the reflection path before changing the camera. A professional can compare the image with the camera’s position, nearby walls, overhangs, and windows. This helps distinguish a reflection from a blocked view or uneven lighting. The goal is to adjust the placement so infrared and visible light do not bounce straight back into the lens.
- Have the camera assessed in relation to nearby walls and overhangs. An indoor dome close to a wall can reflect its own infrared light back into the camera. Moving it farther away may reduce that bounce. Outdoors, an overhang may shade the lens but also limit the field of view, so the installer considers coverage and reflections together.
- Request a careful angle adjustment when the image shows persistent glare. A small change in direction can move a reflective surface out of the camera’s direct view without losing the area being monitored. For an outdoor PTZ camera at the wide end of its zoom, a 30-degree elevation tilt can partially block infrared light. The right position depends on the camera and scene.
- For white dots or lines from an indoor dome’s body, have its position reviewed before applying anything around the lens. Adjusting the tilt angle to within 70 degrees or the yaw angle to within 50 degrees can reduce this type of reflection. These adjustments are relevant to the camera’s orientation, not a universal setting for every model.
- If the camera records through a window, ask a professional to assess whether placing it closer to the glass could reduce reflections. This may help, but the lens still needs a clear view and infrared light must not bounce back from the pane. The installer can also assess whether changing the angle will preserve the intended coverage.
- Review the footage after each placement change, including both daytime and night images. This makes it easier to see whether the adjustment has reduced glare or introduced a new obstruction. If the reflection remains, a professional can reassess the angle, wall clearance, and window position. Professional CCTV camera placement support can help resolve persistent glare without covering the lens.
Infrared night vision reflecting off glass
A professional can help fix a security camera’s infrared night vision reflection by assessing the glass, nearby surfaces, and night image together. The camera’s own infrared can bounce off a window and return to the lens, creating a bright haze.
- Map the reflection across the window before deciding whether the camera position suits the view. A lamp, television, or charging phone beside the camera can appear in the glass at night. The infrared beam can also reflect off the pane and into the lens. Assessing the room and the view beyond the window together helps distinguish these sources.
Consider the intended scene as well as the room. Reflections may make the camera record its indoor surroundings more clearly than the area outside. Curtains or blinds can reduce the light reaching the glass, but they also block the view when closed. Position the camera to preserve the required coverage while accounting for the room’s light sources.
- Consider whether a purpose-built window security camera suits the installation. The term may describe a camera designed to sit close to glass, but suitability depends on its design and how it captures the scene. A professional should assess the mounting, glass, and night image rather than assume any indoor camera will record clearly through a window.
Review how the camera handles night vision in that position. Built-in infrared can reflect off the pane, so the image may still show glare after dark. Assess actual night footage, not just the daytime view, before settling on a camera or mounting arrangement.
- Consider motion detection separately from image clarity. A camera may record movement outside while reflections or indoor lighting affect the footage. Image-based detection responds to changes in video, while a separate motion sensor can detect movement differently. The glass and camera position affect what appears in the recorded scene.
For example, headlights crossing the view or a television changing brightness can alter the image. A professional can review how the selected detection method responds to these changes and whether it suits the area being monitored. Consider the sensor, mounting position, and lighting together.
- Choose the arrangement based on whether night footage or motion alerts matter most. If built-in infrared causes the reflection, a professional can assess whether to turn it off and use suitable external illumination. This may help fix a security camera’s infrared night vision reflection while keeping the intended outdoor scene visible.
Review the view after dark before finalising the mounting. Daytime clarity does not show how the window and indoor lights will affect night footage. A professional can weigh the glass, lighting, camera position, and detection method to select an arrangement suited to the intended view.
Infrared reflection through windows at night
For a camera mounted indoors, assess the window, nearby lights, and detection method together. Reflected infrared can create glare, while indoor light sources can add reflections across the glass.
- Map reflections across the window before deciding whether the camera position is suitable. A lamp, television, or charging phone beside the camera can appear in the glass at night. The camera’s own infrared can also bounce off the pane and into the lens. Have a professional consider the camera, window, and indoor lights as one setup rather than treating glare as a camera fault.
Keep the view through the glass in mind during the assessment. The camera may capture the room’s reflection more clearly than the scene outside, especially when night vision activates. Curtains or blinds can limit indoor light reaching the window, but closing them also blocks the camera’s view. The mounting position must balance the scene to monitor with reflections from the room.
- Consider whether a purpose-built window security camera suits the installation. The phrase can describe systems intended to sit against or close to glass, but suitability depends on the design and how it captures the scene. A professional should assess the mounting arrangement, glass, and night image rather than assume any indoor camera will record clearly through a window.
Review how the camera handles night vision in that position. Built-in infrared can reflect off the pane, so a setup relying on infrared through glass may still produce a bright haze. Assess the camera’s actual view after dark, not only its daytime image. This helps identify whether another placement or lighting approach is more appropriate.
- Review motion detection separately from the camera’s ability to show an image through glass. A camera may record movement outside while reflections or indoor lights affect the footage. The sensor and detection method matter: image-based detection evaluates changes in the video, while a separate motion sensor may respond differently to a window or indoor conditions.
Have a professional consider examples such as headlights crossing the view or a television changing brightness. These changes can alter the image and complicate motion alerts. Detection performance depends on what the system senses and how the window affects its view. The professional can assess the intended area, mounting position, and changing light sources together.
- Choose the setup based on whether night footage or motion alerts are the priority. If infrared reflection dominates the image, a professional can assess disabling built-in night vision and using suitable external illumination. Consider indoor lights near the window too, since lamps, screens, and other sources can reflect into the camera.
Before finalising the mounting, review the scene through the window after dark. A clear daytime view does not establish that night footage will remain usable. A professional can weigh the glass, indoor lighting, camera position, and detection method, then recommend an arrangement suited to the intended view.
Positioning an external IR illuminator away from the camera
A professional can assess whether external infrared lighting could improve the night image without creating another reflection. This can help fix infrared night vision reflection from a security camera, particularly when its built-in IR bounces off glass.
- Trace the internal infrared beam and identify where it reflects. A nearby window, wall, or polished surface can send light back toward the lens. The installer considers the camera’s view, the reflective surface, and the scene that needs illumination before choosing a position for the external light.
- Position the external IR illuminator away from the camera rather than directly beside its lens. Separating the light source changes the reflection angle and can reduce light bouncing back into the camera. The right placement depends on the viewing direction and nearby surfaces.
- For a camera behind a window, assess placing the illuminator outside while the camera remains indoors. This can light the scene beyond the glass without relying on the camera’s internal IR, which may reflect off the pane. The installer considers exterior coverage and the camera’s view through the window.
- Review the night-vision settings alongside the illuminator position. If the camera offers Auto, On, and Off options, a professional can assess whether turning off its internal infrared suits this setup. Judge the effect from the resulting night image, since settings differ between cameras.
- Assess the image after adjusting the light and camera settings. If foreground objects are overexposed while the background remains dark, lowering IR intensity can help balance the scene. A professional reviews the full intended view, not just one bright area, to determine whether the changes reduce reflection.
- Review footage after dark, when infrared reflections are visible. A position that seems suitable in daytime may still direct light onto glass or a nearby surface. Camera direction, illuminator placement, and internal settings all affect the result. Arrange professional CCTV camera installation to assess how to fix security camera infrared night vision reflection in your setup.
KINETIX IT Infrastructure: CCTV Camera Installation
KINETIX IT Infrastructure provides CCTV Camera Installation for homes where infrared glare persists after reviewing camera placement, glass, and lighting. A professional installation can account for the intended view and camera position, addressing reflections as part of the overall setup.
Use this service when a camera needs repositioning, a new installation, or a more considered view through a window. If the camera also relies on a stable network connection, Wi-Fi Installation & Setup or Wi-Fi Troubleshooting & Repair can address connectivity issues separately from image glare.
Share which camera view is affected and whether the reflection appears at night or through glass. Contact KINETIX IT Infrastructure to discuss CCTV Camera Installation for your setup.
Plan the Next Step for Clearer Night Footage
Choose the camera setup around the view you need to preserve, not just the most convenient location. If you need to fix security camera infrared night vision reflection, a professional can assess how the camera, lighting, and network support work together in your home. This keeps the next adjustment focused on the actual viewing problem.
Keep image quality and connectivity distinct. Wi-Fi Installation & Setup, Wi-Fi Troubleshooting & Repair, and Wi-Fi Dead Zone Fixing can address network issues that affect access to camera footage, but they do not remove optical reflections. Distinguishing the two helps direct attention to the right part of the system.
As your home or camera coverage changes, review whether the setup still serves the areas you want to monitor. A considered adjustment can support a more dependable view without adding unnecessary complexity. Contact KINETIX IT Infrastructure to discuss your CCTV camera needs and take the next step with confidence.
Frequently Asked Questions
Can glare permanently harm my CCTV camera?
Infrared glare itself is an image-quality problem and does not show that the camera has suffered permanent damage. A professional can distinguish reflection from a hardware fault by comparing daytime and night footage and checking camera operation. If the image remains distorted in daylight or the camera fails to switch modes, the issue may extend beyond glare. CCTV troubleshooting can assess the camera, its power supply, and its mounting.
Does anti-glare technology improve the quality of CCTV footage?
Yes. Features such as Wide Dynamic Range can improve footage where bright and dark areas appear together, such as a doorway facing a lit exterior. Adjusting exposure, brightness, or contrast may also balance uneven illumination. These tools do not directly remove a reflection in front of the lens. A professional can review a saved night clip and distinguish a lighting imbalance from a reflected image before adjusting settings.
How do I know if the IR LEDs are working?
Look closely at the camera in a dark room. Working infrared LEDs can show a faint red glow, and a phone camera may make it easier to see. To test the day-to-night switch, cover the lens for 5 to 10 seconds during daytime. If the LEDs don’t light or the image stays black at night, the camera may need troubleshooting beyond a reflection adjustment.
How can a CCTV professional stop IR reflection on glass?
A professional can disable built-in infrared when a camera must record through glass, then assess external lighting outside the window. The illuminator should sit away from the camera so its beam does not bounce back into the lens. The professional also considers the recorded image after dark. This helps distinguish reflection control from camera sensitivity or network access problems.
What is IR glare, and how can a professional fix it?
IR glare is an unwanted bright haze, spot, or streak caused when infrared light reaches the lens after reflecting off a nearby surface. A professional traces the artefact in night footage, checks the camera cover and field of view, then adjusts the placement or infrared intensity. If foreground objects are overexposed while the background stays dark, reducing IR intensity can help balance the scene.
Why does my camera work in daytime but not at night?
If the camera records normally by day but shows a black image at night, it may not be switching into night mode. Competing light can prevent the switch or make modes cycle. A professional can test the transition and inspect the IR LEDs. An older analog camera may also lose night vision when a long cable run supplies too little power. These causes require different fixes.
How can a CCTV professional stop IR glare from windows on a security camera?
A professional can compare night footage with the camera’s built-in infrared switched on and off. If disabling it removes the haze, external illumination outside the pane can be considered and positioned away from the lens. Indoor lamps, televisions, and charging phones can add reflections, so the room matters as much as the exterior view. Reflective window film may intensify infrared glare.
How can a professional prevent infrared reflection from walls, eaves, and nearby objects?
A professional reviews camera clearance, mount compatibility, and viewing angle together. A dome close to a wall may need repositioning; an outdoor bullet camera may need a revised angle if a gutter or strap intrudes. The installer also checks nearby objects and contamination on the cover. Lowering IR intensity can help when foreground objects are too bright, while a suitable mount can prevent internal dome reflections.