
A flush finish starts inside the wall, not at the TV. To install a network point behind a wall-mounted television, first assess the wall cavity and plan where the network point and recessed AV plates will go. Then route and connect the cables without trapping them behind the screen.
A tidy installation depends on the wall, TV mount and equipment layout. Positioning the connections carefully keeps sockets accessible while concealing unnecessary cable runs.
This guide explains how to assess the cavity, plan and install the network point and flush sockets, conceal and connect cables, and complete final safety checks. You’ll also learn what to consider when choosing the layout, so the finished setup looks integrated and works smoothly with your TV and connected devices.
Key Takeaways
- Assess the wall cavity and planned fixing points before making openings, so the cable route and plate positions suit the wall and TV mount.
- Choose recessed plates and flush sockets to create a neater finish while leaving enough room for plugs and connections.
- Plan cable paths around the TV’s movement and connected equipment, and avoid trapping or sharply bending cables behind the screen.
- Connect the network point and peripherals, then test the setup and check that cables and fittings are secure before finishing.
- For a coordinated home network, KINETIX IT Infrastructure offers internet wall socket installation, Wi-Fi access point installation and complete villa networking.
Connecting peripherals and keeping cables concealed
Plan each connection before positioning the TV bracket. Cable routes should reach the screen and peripherals without getting trapped when the TV moves.
-
Plan Power and Network Cable Routes
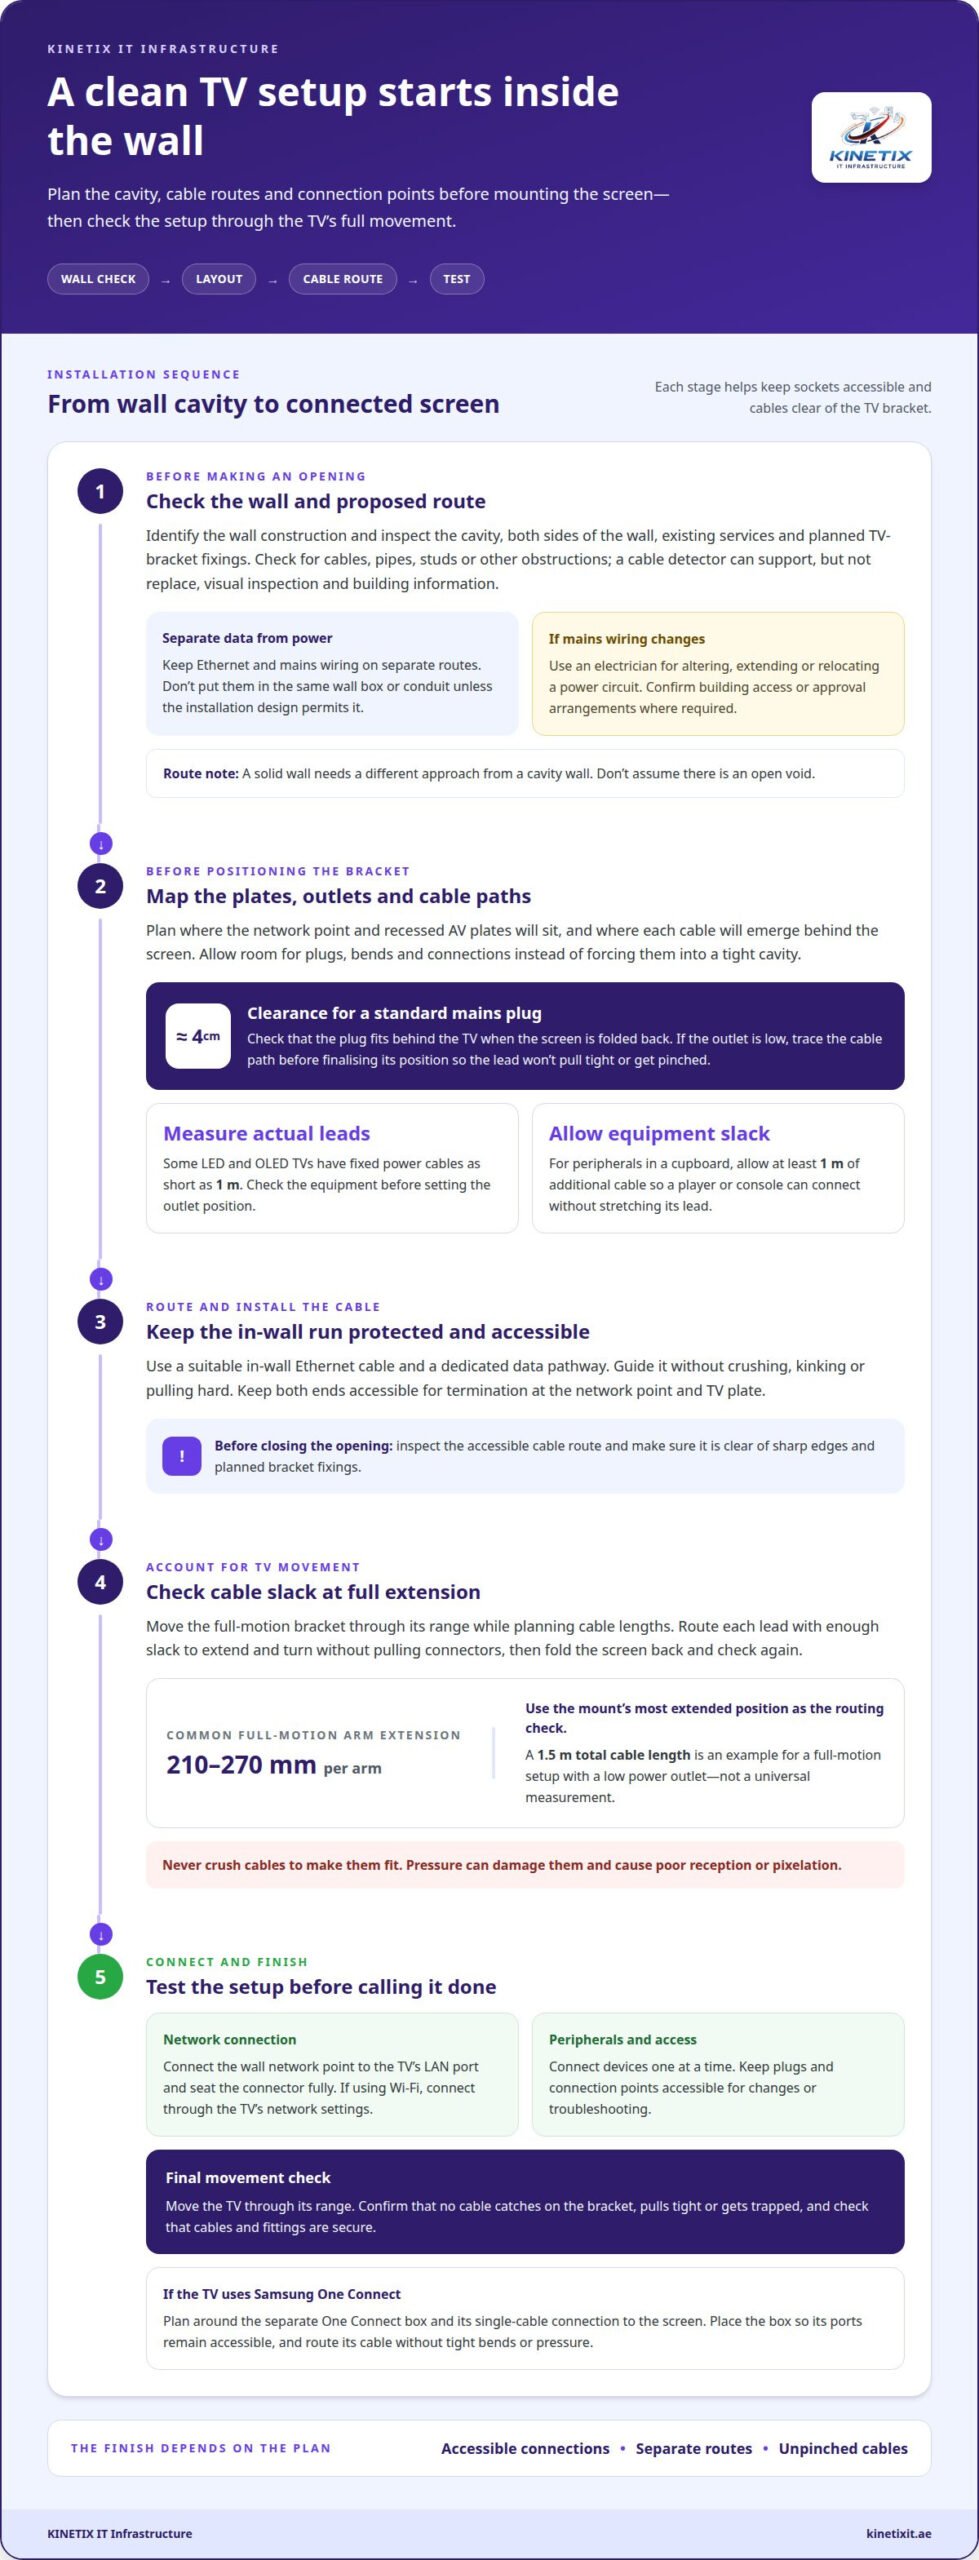
Map the power and network routes before mounting the TV, including where each cable will emerge behind the screen. Keep Ethernet and mains wiring on separate routes. Don’t put them in the same wall box or conduit unless the installation design permits it. Allow room for plugs, bends and connections instead of forcing everything into a tight cavity.
A standard mains plug needs around 4 cm of clearance behind a wall-mounted TV. Check that the plug still fits when the screen is folded back. If the power outlet sits low, trace the cable path to the TV before finalising the layout. This prevents a short lead from pulling tight or being pinched.
-
Choose Ethernet Cable Type and Length
Choose Ethernet cable suited to a fixed route and compatible with your network equipment and TV. The right cable category depends on the devices and the network connection they support, so don’t choose by appearance alone. Leave enough length to reach the network point without tension, and organise any excess behind the screen.
Some LED and OLED TVs have fixed power cables as short as 1 m, so measure the actual equipment leads before setting the outlet position. For peripherals in a cupboard, allow at least 1 m of additional cable. That reserve helps a Blu-ray player or console connect without stretching its lead.
-
Allow for Full-Motion Mount Movement
Extend the bracket through its full movement while planning cable lengths. Full-motion arms commonly extend between 210 mm and 270 mm per arm, and the TV’s movement changes the distance between its ports and the wall outlet. Route each cable with enough slack for the screen to extend and turn without pulling connectors.
Use the mount’s most extended position as a practical routing check, then fold the TV back and check again. A 1.5 m total cable length is an example for a full-motion setup with a low power outlet, not a universal measurement. Never crush cables to make them fit; pressure can damage them and cause poor reception or pixelation.
-
Hide Cables While Preserving Service Access
Guide cables behind the screen, but keep plugs and connection points accessible for equipment changes or troubleshooting. Recessed AV plates can help conceal cable runs. Leave enough room to disconnect a lead without removing the TV bracket or pulling hard on a connector.
For a Samsung TV with One Connect, plan the route around the separate One Connect box and its single-cable connection to the screen. Place the box so its ports remain accessible, and route its cable without tight bends or pressure. Before finishing, move the TV through its range and check that no cable catches on the bracket.
Checking wall cavities before making penetrations
Map the proposed opening and cable route before cutting into the wall. In a UAE home, account for the wall construction, existing services and any building requirements that affect the work.
-
Review In-Wall Cabling Requirements
Identify the requirements that apply to the property before planning an opening. In the UAE, relevant considerations can depend on the emirate, building management requirements and whether the work changes mains wiring. Treat Ethernet cabling and electrical work as separate tasks. A low-voltage cable does not permit changes to a power circuit.
Keep the work within its scope. Installing a network point does not require moving a mains outlet. If the layout involves altering, extending or relocating mains wiring, use an electrician for that work. For example, a plan to move both an Ethernet point and a power socket should separate the data route from the electrical work. Confirm building access or approval arrangements before opening a wall in a managed property.
Record the plate location, cable entry and route before work starts. This gives the electrician and installer a clear view of which parts involve power and which involve data, without treating them as interchangeable.
-
Plan a Safe In-Wall Cable Route
Trace the Ethernet route from its source to the TV before making an opening. Check both sides of the wall and the cavity for existing cables, pipes, studs or other obstructions. A cable detector can help locate concealed services, but use it alongside a visual inspection and building information rather than relying on a single check.
Keep the data route separate from mains wiring, using a dedicated pathway rather than placing both in the same box or conduit. Avoid drilling where the route could intersect an existing service or fixing point. If the wall is solid rather than a cavity wall, the approach will differ. Identify the wall construction instead of assuming there is an open void for the cable.
Use a suitable in-wall cable and guide it without crushing, kinking or pulling hard. Keep both ends accessible, with enough room to terminate the cable at the network point and TV plate. Before closing the opening, inspect the accessible route and check that the cable is clear of sharp edges and planned TV-bracket fixings.
For a planned data run, Ethernet cable installation can help align the route, wall opening and network point with the TV position.
Connecting equipment and final safety checks
- Connect the Ethernet lead from the wall network point to the TV’s LAN port. Seat each connector fully, then check that the cable does not pull tight when the screen moves. If the TV uses Wi-Fi, connect it to the home network through its network settings. Make clear whether the TV uses a wired or wireless connection, so it follows the intended route.
- Connect peripherals one at a time, such as a games console, streaming device or Blu-ray player. Match each device to the correct HDMI input, then select that input on the TV. If a device is in a cupboard, trace its cable to the correct port before closing the cupboard. This makes it easier to find a misplaced connection without disconnecting every device.
- Test the TV’s network connection before securing the final cable arrangement. Open the network status screen and check that it shows an active connection. Then open an app or service that uses the network to confirm the TV can access online content. If it fails, reseat the Ethernet connectors and check the router or network switch connection before changing the TV settings.
- Check every cable while moving the TV through its normal range. A full-motion bracket can pull a lead at full extension or pinch it as the screen folds back. Look behind the display for pressure points, sharp bends and connectors rubbing against the mount. Keep power leads and data connections identifiable, and leave enough access to unplug a device for service without dismantling the installation.
- Complete the final inspection before concealing the connections. Confirm the network point and AV plates are secure, the TV remains firmly attached, and no cable is trapped between the bracket and wall. Test each connected device and its selected input again. For a ceiling-mounted TV with connected equipment elsewhere, an HDMI-CAT6 Balun can carry the connection over CAT6 cabling. Keep its transmitter, receiver and connected leads accessible for troubleshooting.
- Keep the final electrical check separate from network testing. Ethernet status confirms data connectivity, but it does not establish that mains wiring or a power outlet is safe. If the installation involved changes to mains wiring, have an electrician check that work. Once the screen, network connection and peripherals work correctly, tidy the remaining cable slack without crushing or tightly bending the leads.
Before treating the installation as complete, verify that the fixed bracket was selected for the TV’s VESA mounting pattern. The listed patterns to check are 200×200, 300×300 or 400×400. Compare the pattern required by the TV with the one supported by the bracket before relying on the existing fit. If you are unsure which pattern applies, pause and confirm it from the TV and bracket information rather than forcing a connection. This check complements the final cable and attachment inspection: a tidy connection arrangement does not replace confirming that the chosen mounting pattern is appropriate.
Installing flush sockets
Fit the Ethernet point and flush sockets after confirming their positions, wall depth and cable entry. To install a network point behind a wall-mounted television, match the fittings to the wall cavity and keep the connections reachable once the screen is mounted.
-
Install the Ethernet Network Point
Position the Ethernet point behind the TV so its port does not press against the screen or bracket. Match the faceplate and back box to the wall construction and available depth. Flush sockets can sit only a millimetre or two from the wall. Replacing a standard socket with a flush fitting could reduce how far it protrudes by around half a centimetre.
Feed the Ethernet cable through the planned entry, leaving enough working length for termination without pulling it tight. Secure the back box and keep the cable clear of its edges. Align the plate before tightening its fixings. If the TV covers the point, check that you can still connect or release the plug when the screen tilts or moves.
Keep the Ethernet fitting separate from mains wiring. If the layout also requires a power socket, treat that as a separate electrical task. A low-voltage network point does not make it appropriate to alter mains connections. Even in a combined plate layout, keep the data connection and power fitting in their intended positions.
-
Terminate and Test the Wall Jack
Terminate the Ethernet conductors at the jack, following its marked colour code. Use the same wiring scheme at the wall jack and the corresponding connection end. Preserve the twists in each cable pair as close to the termination as the jack allows. Avoid nicking the conductor insulation when seating the wires, as poor contact can disrupt the link.
Use a punch-down tool if the jack requires one, then trim the excess conductor neatly. Fit the jack into its plate without trapping the cable behind it. Don’t force a tight bend or push the plate against a cable bundle. Tighten the fixings evenly so the plate sits flat against the wall.
Test the run with an Ethernet cable tester connected at both ends. Check that its wire map shows each conductor reaching the matching position. If the result shows a fault, inspect both terminations before reconnecting the TV. Then connect the wall jack to the router or network switch and the TV to the room outlet. The installation is complete only when the TV shows a wired connection and can access an online service.
Recessed TV and AV wall plates
Choose plates that suit the TV’s connections and the wall cavity. Plan each opening around the bracket, cable route and equipment layout.
- List the connections your TV setup needs before selecting a plate. For example, a smart TV may need Ethernet and power, while a console adds an HDMI lead. Group the required connection points behind the screen, but keep each port reachable after mounting. A plate with unused openings can look untidy, while too few connections may leave exposed cables or require changes later.
- Choose a recessed plate designed for the cables it will carry. Ethernet, HDMI and aerial connections use different fittings, so match each port to its connector. A brush plate lets loose cables pass through an opening, while a fixed AV plate provides dedicated sockets. Consider the equipment, cable terminations and access needed for future changes.
- Position the plate within the TV’s covered area, then compare its location with the bracket arms and mounting points. Keep it clear of the bracket fixings. Check where the TV ports will sit once the screen is mounted, and whether connectors can be inserted without pressing against the wall. A small adjustment can make connections easier to reach.
- Check the cavity depth and space behind each plate before cutting the opening. Recessed fittings need room for their bodies, cable entries and connector bends. Don’t force a deep connector into a shallow cavity or press a plate against a cable bundle. Keep power and low-voltage connections in their intended fittings, rather than passing mains plugs through an AV opening.
- Fit each plate level, secure its back box and connect the labelled cables before attaching the TV. Test Ethernet and HDMI connections at their intended devices. For example, confirm the TV recognises the wired network and displays the console’s picture. Then mount the screen and recheck access to every port. For a coordinated TV network and wider coverage, plan Wi-Fi access point installation around the home’s connected devices.
KINETIX IT Infrastructure: Wi-Fi Access Point Installation
KINETIX IT Infrastructure can help connect your TV installation to a well-planned home network. Wi-Fi Access Point Installation can address weak wireless coverage around the TV or other connected devices. For wired access, Internet Wall Socket Installation provides a dedicated network point. Wi-Fi Installation & Setup and Complete Villa Networking can support broader connectivity needs across the home.
Turn to KINETIX IT Infrastructure when you want the network point, TV and household connectivity considered together. Contact KINETIX IT Infrastructure to discuss your home network setup.
Make Your TV Setup Part of a Connected Home
Planning to install a network point behind a wall-mounted television is also an opportunity to consider how the room fits into your wider home network. A connected TV is one part of the setup, while reliable Wi-Fi supports other devices and everyday use throughout the home. KINETIX IT Infrastructure offers Wi-Fi Installation & Setup, Wi-Fi Troubleshooting & Repair, and Wi-Fi Dead Zone Fixing for different connectivity needs.
If coverage issues or network problems affect your setup, choose support that addresses the connection beyond the TV itself. A considered next step can bring wired access, wireless coverage and connected devices together in a coherent home network.
Contact KINETIX IT Infrastructure to discuss your network needs and take the next step toward a more connected home.
Frequently Asked Questions
What tools and materials are needed to install an Ethernet wall outlet?
Gather a compatible Ethernet jack, faceplate and back box, along with suitable cable and termination tools. A punch-down tool seats conductors in many keystone jacks, while an Ethernet cable tester checks the completed run. For the opening and route, prepare a drill, a wall-compatible cutting tool, a cable puller and a detector for concealed services. The wall type and chosen plate determine which fittings are suitable.
How do I locate studs, pipes and electrical wires before cutting into a wall?
Use a suitable wall scanner and mark likely obstructions before choosing the opening. Scan the area in different directions, then compare the readings with visible sockets, switches, plumbing fixtures and the other side of the wall. Wall construction can differ between homes in Dubai, so don’t assume a cavity is clear. If readings conflict or a service route remains unclear, avoid cutting there.
What are the risks of drilling behind a wall-mounted TV?
Drilling can hit concealed electrical wiring or plumbing, damage existing network cables, or interfere with the TV bracket’s fixings. Contact with live wiring can create a serious electrical hazard, while a damaged pipe can cause water damage inside the wall. The bracket may also become insecure if drilling weakens or intersects its fixing area. Stop if the drill meets unexpected resistance, and reassess the route before continuing.
What alternatives are there to a wired Ethernet point behind a TV?
Wi-Fi is the simplest alternative if the TV receives a stable signal where it is installed. If coverage is weak, a Wi-Fi access point can improve connectivity in that area, with placement based on the home’s layout and network. Another option is to route Ethernet externally in a suitable surface cable cover, avoiding a new wall opening. Choose based on signal quality, cable visibility and the room’s installation constraints.